 The Scientific Vapor 2-Channel passive and self administrative controller gives the user several options in controlling our vaporizers. Whether your experiment involves using a passive timed administration of vapor or mouse/rat self administering this controller will do it all. This two channel controllers has several helpful features including;
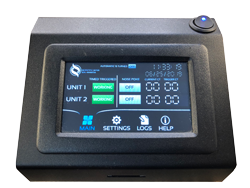
Vaporizer Controller
Passive Settings (drug studies) – Under the passive timed settings screen the user is able to set the amount of vapor in seconds. This is the time that the vaporizer is running producing the vapor into the cage. The user then can set the number of repeat cycles. A good example of the repeat cycles function is when a user would like 20 seconds of vapor but knowing that the coil can only handle a 10 seconds run time, the user can then set the repeat cycles to two 10 second cycles to achieve the 20 seconds of vapor. The passive settings also has a delay or wait time between the vapor sessions. The user can choose from hours, minutes and seconds to wait. A example of the wait time under a passive experiment is when a user would like to have a 10 seconds blast of vapor every 5 minutes. The user would then set the vape time to 5 seconds, and the wait time to 5 minutes so the mouse or rat would be receiving a 5 second vapor blast every five minutes. This would continue until the user turns the passive mode off.
Self Administration Settings (behavior studies) – In the settings page of the controller, the user can set up the self administration settings they desire. It features a poke count, vape time, time out delay, and a preset gradual scale settings. The poke count is the number of times a mouse or rat must break the ir-beams or push down on the levers in the cage in order to be delivered a blast of vapor. So if the poke count is set a 2 then the mouse or rat must break the ir-beam or push down on the lever two times to be delivered any vapor. The vape time is the time the vaporizer is turned ON (in minutes and seconds). The time out delay is a setting the user can make so that the mouse or rat is not delivered vapor. This is also done in minutes and seconds. During the time out period, the mouse or rat will not be delivered any vapor but the ir-beam or lever press will be counted in the logs. This is helpful to understand how many times vapor was requested, but not delivered.
The Main Screen – On the main screen of the controller there are several options. Under the timed trigger side you will see two OFF buttons. One for unit 1 and one for unit 2. The units represent the attached vaporizers. To turn the session on, after you have set it up, simply push the “OFF” button and it will turn to “Working” and illuminate green. This means that your passive experiment is underway. On the nose poke portion of the screen you will see the same “OFF” buttons, but will also notice some digits for current count and trigger count. The current count is the count of the ir-beam or press lever has been activated. This allows the user to see how many times the mouse or rat has requested the vapor. The trigger count is the number of times it will take the mouse or rat to activate the vaporizer. These settings can all be set up in the settings menu under Nose Poke Triggered.
Automatic Settings – Under the automatic settings the user can set up a start and stop time to an experiment (find these settings under Settings Menu / Automatic). The user must set a future start and stop time by putting in the hour, minute, and seconds the would like the controller to start working, then press the “OFF” button above the desired time. The off button will turn to ON and illuminate green. Set up your vape time settings under either the timed triggered or nose poke triggered screens then head back to the main page and turn the Units 1 or 2 from OFF to ON and you now see at the very top “automatic is turned: ON” to know it is working. At the desired start time the signal will be sent to the vaporizer and turn it on and start the session. This is a great setting for passive experiments when a user would like the experiment to start and stop at a certain time of day.
Log Screen – The log screen shows both time triggered events and nose poke triggered totals. Under the time triggered totals you will see a running count of the amount of time the vaporizer has been ON. The poke triggered totals will show both the time the vaporizer has been ON and the total number of pokes the mouse or rat has made. Before any experiment the user does need to press the RESET button on the log screen to clear out any previous logs from prior use.
SD Card – Using the provided 2gb sd-card each of the experiments are recorded into a .csv file that will show each vaporizer unit, the vapor time for the unit and the nose poke count for each of the nose pokes. This data is easily viewable in Excel as a spreadsheet. To use the sd card feature, make sure you first format the sd-card before inserting it into the controller. Things to note about the sd-card; the controller must be OFF when the sd-card is inserted. Only a 2gb sd-card can be used with the controller and it must be formatted to FAT in order for the data to be written to it.